In World War II aviation history, few stories are as compelling as that of the Spitfire and the Japanese Zero. These two formidable aircraft, icons of their respective nations, have left a mark on the history of aerial combat. But what distinguished the British Spitfire from the Japanese Zero? Let’s dive into the depths of this question, navigating the subtle differences and striking contrasts of these two aerial titans.
Genesis and Birth
First, it’s essential to consider the philosophies behind their designs. The Supermarine Spitfire, heralded as Britain’s savior during the Battle of Britain, was a combination of art and engineering. Born from R.J. Mitchell’s genius, the Spitfire boasted a sleek elliptical wing, making it aesthetically pleasing and allowing for great agility and high-speed performance.
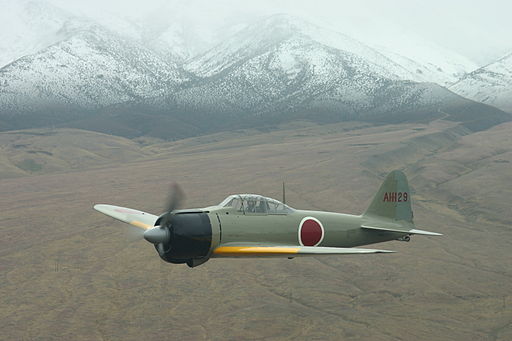
On the other hand, the Mitsubishi A6M, commonly known as the Zero, was Japan’s jewel of the skies. Chief designer Jiro Horikoshi led the Japanese to craft a lightweight, long-range fighter. The Zero was unique in its unmatched range, making it ideal for the vast Pacific theater. Its lightness was its strength, but as we’ll discover later, also its Achilles’ heel.
Power vs. Agility
Performance-wise, the Spitfire and the Zero were, in many ways, opposites. With its constant improvements, the Spitfire’s Rolls-Royce Merlin engine endowed it with raw power, enabling it to engage in vertical dogfights effectively. This was a stark contrast to the Zero, which prioritized maneuverability. The Zero could dance around many opponents with its lightweight frame, especially at lower speeds.
However, while the Zero’s agility was legendary, it came at a price. Armor was minimal to maintain its low weight, and self-sealing fuel tanks, a common feature in Allied planes, were omitted. Consequently, the Zero tended to catch fire once hit or suffer significant damage.
Tactics and Engagement
These fundamental differences in design philosophy led to contrasting tactics in the air. Spitfire pilots, aware of the Zero’s nimbleness, often sought to avoid prolonged low-speed dogfights. Instead, they’d utilize the Spitfire’s superior power to climb rapidly and then dive onto unsuspecting Zeros, leveraging the energy tactics that the Spitfire excelled at.
Zero pilots, well aware of their aircraft’s vulnerabilities but confident in its capabilities, often attempted to draw enemies into close, low-speed engagements. In these scenarios, the Zero’s superb low-speed handling usually allowed it to out-turn adversaries.
Evolution and Adaptation
As the war progressed, both planes underwent numerous modifications. The Spitfire saw several versions, each with armament, armor, and engine power improvements. It evolved from a home defense fighter to an all-round aircraft capable of varied roles across multiple theaters.
The Zero too saw improvements but arguably struggled to keep pace with the rapid advancements of its adversaries. By the war’s latter stages, newer American fighters like the F6F Hellcat and F4U Corsair began to outclass the Zero, exploiting its weaknesses while countering its strengths.
Legacy
Overall, the Spitfire and the Zero were more than just machines of war. They embodied the national spirit and symbols of their nation’s engineering prowess. Their engagements in the vast skies were battles for territorial dominance and a dance of contrasting philosophies, tactics, and innovations.
While the Spitfire is often celebrated for safeguarding Britain from invasion, the Zero stands as a testament to Japan’s audacious challenge against the might of the Western powers. Though different in many ways, both fighters share a legacy of determination, ingenuity, and bravery.
For more insights into the Japanese A6M2 Model 21 Zero and other important military aircraft, visit Aces In Action. Here, you’ll find an amazing piece of artwork by Craig Tinder titled “Tainan Kokutai,” which depicts the early years of FP01c Saburo Sakai from the Tainan Kaigun Kokutai on 7 August 1942. The limited edition canvas print even includes a piece of aluminum from an A6M2 Model 21 Zero Fighter from the Tainan Kaigun Kokutai – the same unit that WW2 ace Saburo Sakai served, making it a unique piece of history!
Tainan Kokutai – A6M2 Zero Aviation Art by Artist Craig Tinder
7 August 1942 – Japanese flying ace FP01c Saburo Sakai, leads his squadron from the Tainan Kaigun Kokutai, based at Lakunai Airfield near Rabaul, New Britain Islands. Sakai claimed three kills during this mission before becoming seriously wounded while attacking SBD Dauntless dive bombers. Sakai was one of only a few Japanese Aces who began combat operations at the onset of the war in December 1941 and survive until the end.


Share:
Why Did the Stuka Scream? The Acoustic Terror of World War II
The Ten Deadliest Fighter Aircraft of World War II