This Fine Art Print by Artist Craig Tinder honors the crews in Vietnam who flew the Bell AH-1 Cobra Gunship. This Limited Edition Canvas Print includes an actual fragment from an AH-1 Cobra Battey Panel Assembly.
Details About the RELIC:
This relic is an original component from the iconic AH-1 Cobra Gunship, a key attack helicopter that has served the U.S. military for decades. Specifically, this part (Part No. 205-060-873-001) comes from the aircraft's battery panel assembly, which played a crucial role in housing and protecting the helicopter's electrical power source. The panel retains its original paint, providing a unique snapshot of the Cobra's distinctive appearance during its time in service.
 AH-1 Cobra Gunship Battery Panel used as relic included in "Centaur Cobras" limited edition prints
Constructed from aluminum with a molded fiberglass backing, this component was designed to be both lightweight and durable, capable of withstanding the harsh conditions faced in combat environments. The use of fiberglass in its construction highlights the Cobra's advanced design, as the aircraft was known for combining agility with firepower, enabling it to serve as an effective gunship in both reconnaissance and attack missions.
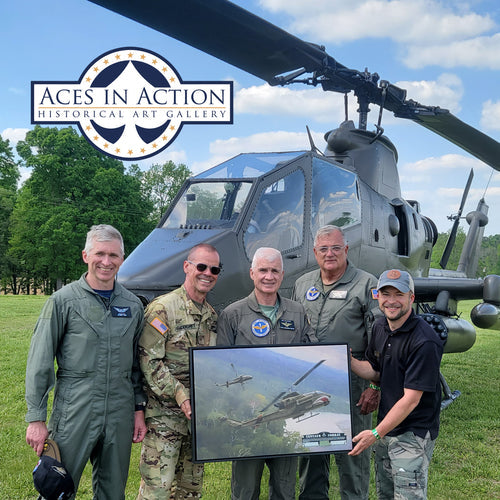
 Artist, Craig Tinder, holding Cobra Gunship relic that is included in the "Centaur Cobras" limited edition prints
The AH-1 Cobra first saw action during the Vietnam War, where its reliability, speed, and firepower earned it a legendary status. Over time, it has been used in various conflicts around the world, including the Gulf War and operations in the Middle East. This relic serves as a tangible reminder of the aircraft’s enduring legacy and the role it played in modern military aviation.
The Story Behind the Print:
In August 1972, 1LT Kenneth R. "Ken" Mick flew his AH-1G Cobra Gunship (68-15012) in support of the 2nd Brigade, 25th Infantry Division during the Vietnam War. The skies of Vietnam had become increasingly perilous for U.S. helicopter pilots due to the introduction of the Soviet-made SA-7 "Strela" Surface-to-Air Missile (SAM). The SA-7, a shoulder-fired heat-seeking missile, posed a new and deadly threat to low-flying U.S. aircraft, which relied heavily on mobility and altitude for survival in combat.
 AH-1 & crew from The Army Aviation Heritage Foundation and the artist
To counter this emerging danger, the U.S. military implemented an "up-turned" exhaust modification and auxiliary scoop kit to reduce the heat signature of helicopters like the AH-1G Cobra, which would otherwise be an easy target for the SA-7’s heat-seeking technology. Cobra No. '012, piloted by 1LT Mick, was among the first combat Cobras to receive this upgraded suppression kit, significantly reducing the risk of missile attacks. This crucial modification diverted hot exhaust gases away from the aircraft's rear, making it harder for heat-seeking missiles to lock onto the aircraft's engine.
As Mick surveyed the dense and rugged Vietnamese landscape from the cockpit of his Cobra, his mission was to provide close air support and reconnaissance for ground troops. The Cobra, with its advanced firepower, including rockets and a 20mm cannon, was instrumental in these missions. The added protection of the suppression kit enabled Mick and his fellow pilots to engage enemy forces with greater confidence, knowing their aircraft were better equipped to evade the increasingly sophisticated threats of the battlefield. The retrofitting of these countermeasures to Cobras like Mick’s AH-1G represents a significant chapter in the evolution of combat aviation during the Vietnam War.
Learn more about Which is better – the Cobra or the Apache Helicopter? Click Here
To purchase or see similar items, visit here.
Commissioned by Museums, Treasured by Collectors


Share:
Titanium Legacy, the story behind "Mach 3.2"
Wings of Fire, the story behind "Longbow On Patrol"